.single.post-author, Author: Konstantinos Tsoukalas , Last updated: June 12th, 2025
If the name of your Windows 11/10 computer doesn’t show up in its own File Explorer > Network, then continue below to fix the problem.
Symptom: While Der Name Ihres Computers wird im Netzwerk-Explorer anderer Computer angezeigt. Er wird nicht in Ihrem angezeigt. (The issue was first discovered in Windows 10 and still exists in Windows 11.)
For example: On a network with 3 computers named”HostPC”,”PC1″&”PC2″, where”HostPC”is the computer we are on, when we go to File Explorer > Network on our computer (“HostPC”), its name does not appear on the network and we only”see”the other two computers named”PC1″&”PC2″. At the same time the”PC1″&”PC2″computers can”see”our computer’s name in their Network Explorer.
Cause: The problem is caused because the”Function Discovery Resource Publication (FDResPub)”, which is responsible for discovering a computer on a network, is not working properly and must be restarted in order to display the computer’s name in its own Network Explorer.
If your computer name does not shown in your network explorer (File Explorer > Network), follow one of the methods below to fix the issue.
How to FIX: Your computer name does not appear in your Network Explorer (Windows 10/11).
Method 1. Manually Restart”FDResPub”service.
The first method to force your Network Explorer (File > Network) to display the name of your computer, is to manually restart the “Function Discovery Resource Publication (FDResPub)” Service. To do this:
1. Press the Windows + R keys to open the Run command box
2. Type services.msc and click OK to open Windows Services.
3. Right-click on the “Function Discovery Resource Publication (FDResPub)” service and select Restart.
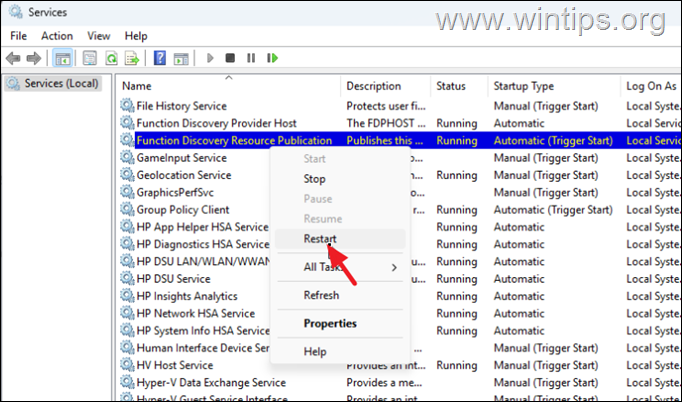
4. Then open File Explorer, click on Network and you will see your computer name in the list of network computers.*
* Note: keep in mind that this method works temporarily and after several minutes your computer’s name will disappear again from its own Network Explorer. To workaround this, follow the instructions on method-3 below.
Method 2. Restart”FDResPub”service using a batch file.
To avoid having to go to Services every time to restart the Feature Discovery Resource Publishing (FDResPub) service, you can create a batch file on your desktop and run it when needed. To do this:
1. Open Notepad and copy & paste the below command:
powershell.exe Restart-Service-Name FDResPub 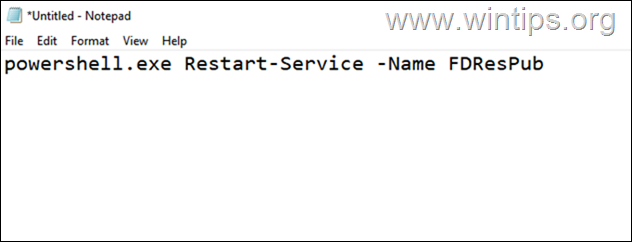
2a. Then select File > Save As.
2b. im Fenster speichern :
klicken Sie auf Desktop links (um die Stapeldatei auf Ihrem Desktop zu speichern). Change the Save as type to: All files (*.*). Type as File name: “FDResPub.bat” Click Save and then close Notepad. 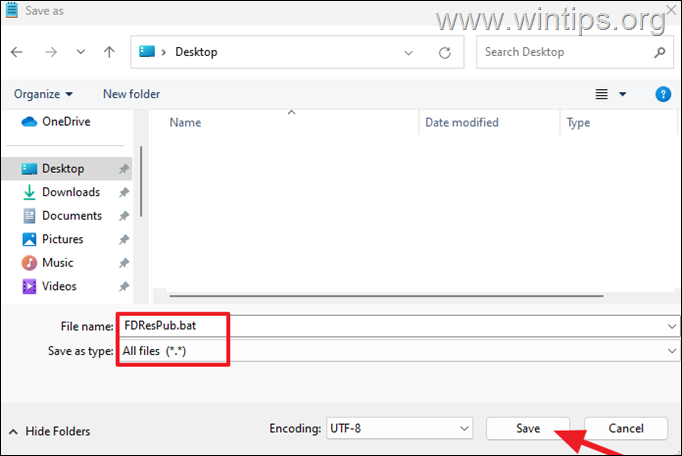
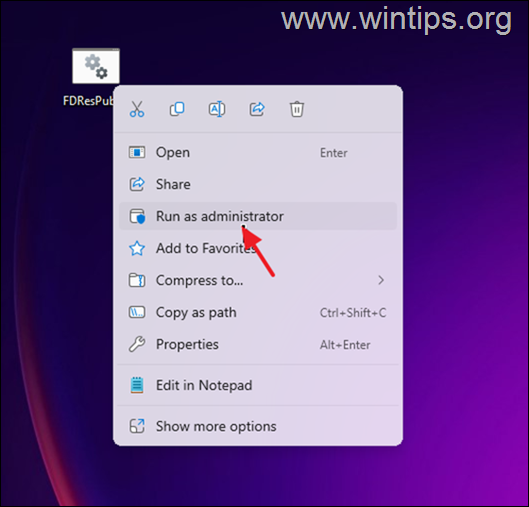
3. From now on, when you need to show your computer name in File Explorer > Network, just right-click on the”FDResPub.bat”file and select Run as Administrator. *
* Note: keep in mind that this method works temporarily and after several minutes your computer’s name will disappear again from its own Network Explorer. To workaround this, follow the instructions on method-3 below.
Method 3. Repeatedly Restart”FDResPub”service using Task Scheduler.
Another workaround to fix the problem is to automatically restart the FDResPub service every 1 minute via the Task Scheduler. If you want to do this, do the following.
1. Open Task Scheduler and choose Create Task.
2. auf der Registerkarte”
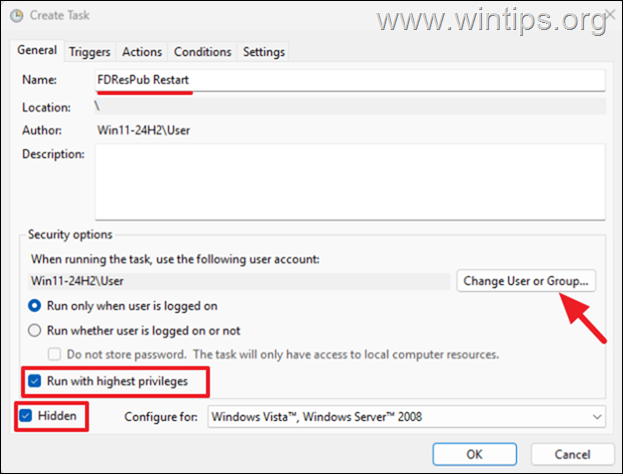
a. Nennen Sie die neue Aufgabe als” fDespub neu starten “
b. Stellen Sie es auf Run mit den höchsten Privilegien ein
c. Select Das Checkbox
d
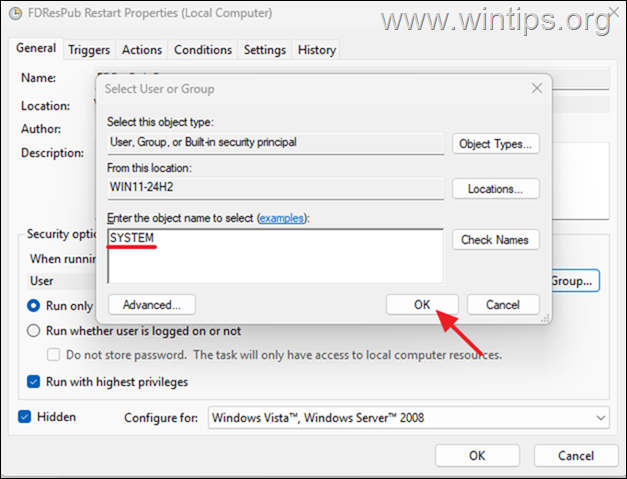
d. Click Change User or Group.
e. Type”SYSTEM“and click OK.
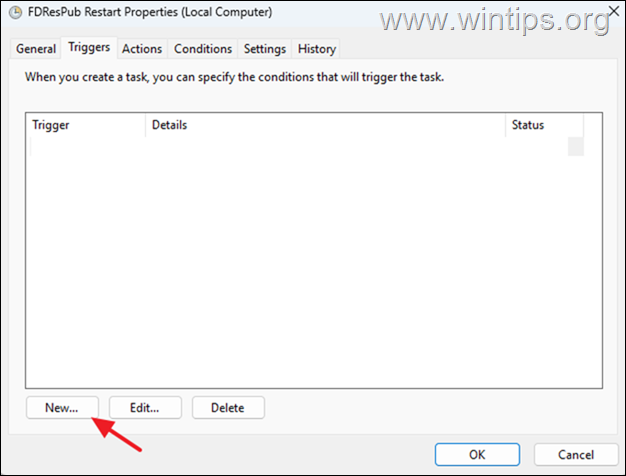
3. Now select the’Triggers‘tab and click New.
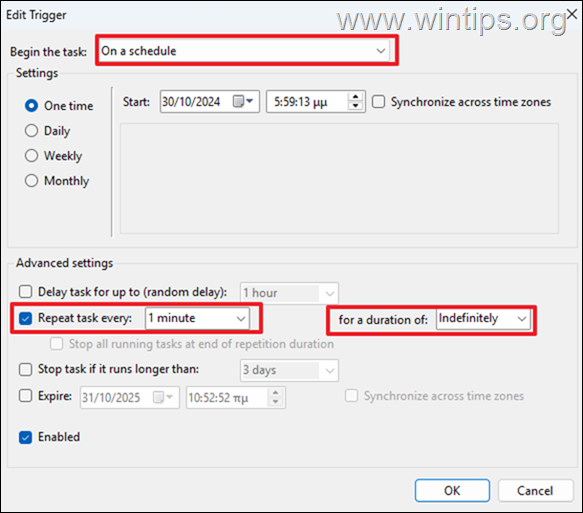
3a. On the’Edit Trigger‘options, select to:
Begin the task: On a schedule Repeat task every: type“1 minute”for a duration: Indefinitely
3b. When done, click OK.
4. Then select the’Actions‘tab and click New.

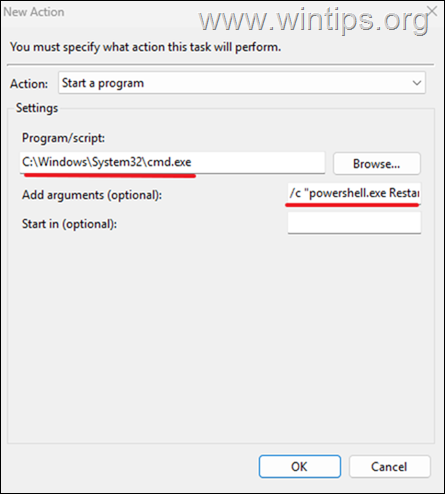
4a. On the’New Action‘window:
In Program/Script field, type: C:\Windows\System32\cmd.exe In Add argumets (optional) field, type: /c”powershell.exe Restart-Service-Name FDResPub”
4b. When done, click OK.
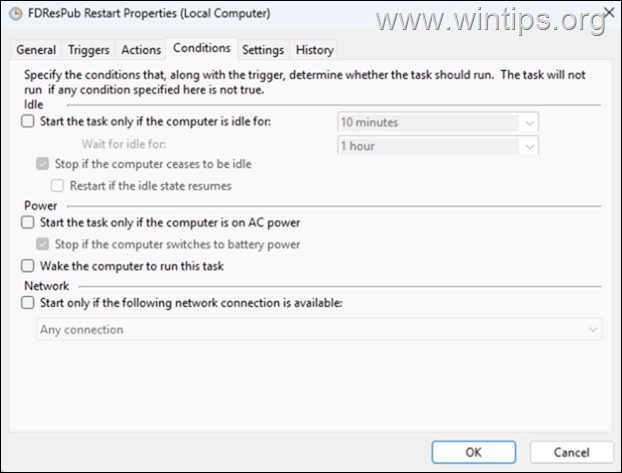
5. Now select the’Conditions‘and uncheck all options.
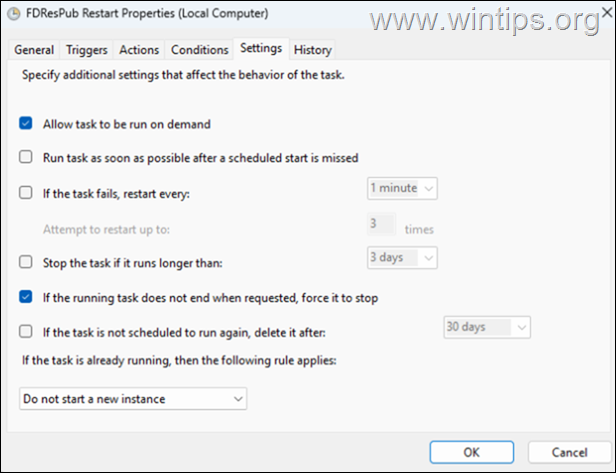
6a. Finally select the’Settings‘tab, and leave checked only the options:
Allow task to auf Bedarf laufen. When done click OK.
7. Neustart den Computer neu starten. Nach einer (1) Minute sehen Sie, dass Ihr Computername zusammen mit allen anderen Computern im Netzwerk angezeigt wird.
Das ist es! Welche Methode hat für Sie funktioniert?
Lassen Sie mich wissen, ob dieser Leitfaden Ihnen geholfen hat, indem Sie Ihren Kommentar zu Ihrer Erfahrung hinterlassen. Bitte mögen Sie diesen Leitfaden und teilen Sie diesen Leitfaden, um anderen zu helfen. Even $1 can a make a huge difference for us in our effort to continue to help others while keeping this site free:  Konstantinos is the founder and administrator of Wintips.org. Seit 1995 arbeitet er und bietet IT-Support als Computer-und Netzwerk-Experte für Einzelpersonen und große Unternehmen. Er ist spezialisiert auf die Lösung von Problemen im Zusammenhang mit Windows oder anderen Microsoft-Produkten (Windows Server, Office, Microsoft 365 usw.). Neueste Beiträge von Konstantinos Tsoukalas (siehe alle)