Knowing how to record your screen on an iPhone can come in handy in a variety of situations.無論您想捕獲遊戲玩法,創建教程還是記錄軟件錯誤,iPhone屏幕錄製都是一種節省顯示屏上發生的事情的快速便捷方法。 Best of all, screen recording on an iPhone is so easy that anyone can do it in seconds, and it only takes a few taps.閱讀本指南以了解如何通過三個簡單步驟在iPhone上進行屏幕記錄:
步驟1。如何在iPhone控制中心添加屏幕記錄
自iOS 11以來,內置的iPhone屏幕錄製功能就已經存在。要使用它,第一步是將其添加到控制中心。 Luckily, you only need to do this once. If you’re wondering how to add Screen Recording to your iPhone, this process is different depending on the iOS version you’re using.請按照操作系統的步驟操作。
較新的)
iOS 18中的控制中心帶來了一些更改,其中之一是您不再需要瀏覽設置應用程序即可添加更多圖標。 You can now customize everything directly from the Control Center panel.首先,通過從屏幕上右上角向下滑動(或從iPhone SE上的屏幕底部向上)打開控制中心。
在ios 18
height=”648″ src=”https://windows.atsit.in/bc/wp-content/uploads/sites/8/2025/07/e5a682e4bd95e4bba53e5808be7b0a1e596aee79a84e6ada5e9a99fe59ca8iphonee4b88ae7afa9e981b8e8a898e98c84.png”>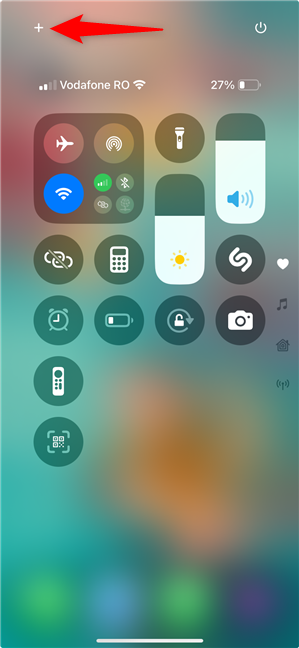
Press + to start editing the Control Center
When the icons in the Control Center start pulsating, tap Add a Control at the bottom of the screen.
src=“ https://www.digitalcitizen.life/wp-content/uploads/2023/03/iphone_screen_recording-2.png”>
添加一個控件以將屏幕記錄添加到iPhone
中,以顯示所有可用的控件。 It’s not hard to figure out what to do next: tap Screen Recording on your iPhone.
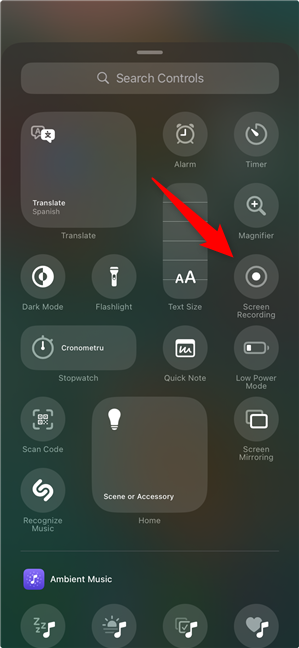
The iPhone Screen Recording icon is added in the first available spot.您可以將新的控件拖放到本小組中的任何地方。高度=“ 648″ src=” https://www.digitalcitizen.life/wp-content/uploads/2023/03/iphone_screen_creen_recording-4.png> you can screen record on your iPhone.向下滾動到第2步以繼續。
如何在運行較舊的iOS版本
上獲取屏幕記錄,如果您想知道如何將屏幕記錄添加到不支持iOS 18的iPhone,則該過程也很簡單。首先,打開設置應用程序和點擊控制中心。
訪問控制中心
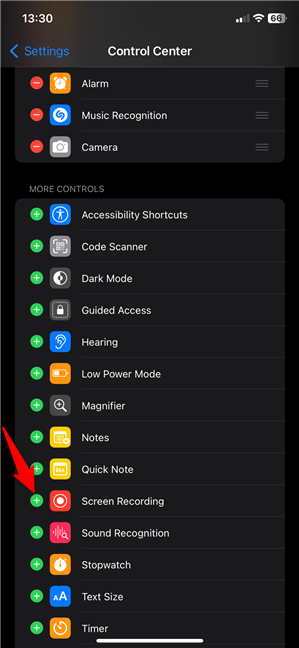
訪問控制中心的兩個列表中有兩個列表,在控制中心設置中有兩個列表。 To use the Screen Recording feature, it needs to be in the Included controls list.如果不存在,請向下滾動到更多控件,找到屏幕記錄條目,然後點擊旁邊的加號(+)按鈕。
如何使用iOS 17或舊
添加ios
如何使用iOS 17或舊
添加屏幕錄製 src=”https://www.digitalcitizen.life/wp-content/uploads/2023/03/iphone_screen_recording-7.png”>The iPhone screen record feature is add to the Included Controls
You can use the hamburger button next to it to move the entry further up.否則,在列表中的所有其他圖標之後,在控制中心的底部添加了屏幕記錄控件。
步驟2。如何在iPhone
上錄製屏幕,您可以開始使用從控制中心使用iPhone屏幕錄製。 Accessing it differs depending on your iPhone: on iPhone X and newer models, swipe down from the top-right corner, as seen below.在較舊的iPhone上,從屏幕的底部向上滑動。
訪問控制中心中的控制中心
在控制中心中訪問屏幕記錄。雖然按鈕的形狀可能有所不同,但圖標看起來相同:一個圓圈內的大點。
width=“ 299″高度=“ 648″ src=“ https://www.digitalcitizen.life/wp-content/wp-content/uploads/2023/03/iphone_screen_creen_recording-.png.-png>要退出控制中心並返回屏幕。高度=“ 648″ src=“ https://www.digitalcitizen.life/wp-content/wp-content/uploads/2023/03/iphone_screen_recording-10.png-> screenshots) to access more settings before you begin.下次開始記錄時,將保存這些設置並自動使用(除非您再次輸入此屏幕以更改它們)。使用屏幕底部的麥克風打開/關閉圓形按鈕,還可以在視頻中記錄您的聲音,而不僅僅是iPhone播放的聲音。

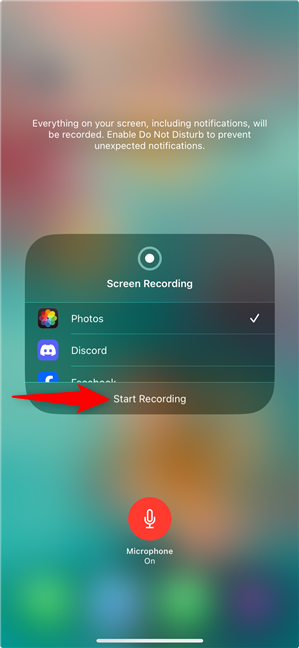
Turn on the Microphone for an iPhone screen recording with the sound of your voice
Use the panel in the middle to decide what happens to your video.默認選項是將其保存在照片應用程序中,但是您也可以通過檢查此列表中的所需選項在Facebook,Instagram,Discord,Telegram或其他應用程序上將其保存。
如果一切都是您想要的,請點擊開始錄製(或開始廣播)。在面板的頂部顯示了3秒的倒計時,因此請使用此時間導航到要記錄的屏幕。
How to record your iPhone screen
As long as you’re recording, a red bar is displayed at the top of your screen.在較新的iPhone型號上,它謹慎地顯示在您的左上角,圍繞您的時鐘。 width=“ 299″高度=“ 648″ src=“ https://www.digitalcitizen.life/wp-content/wp-content/uploads/2023/03/iphone_screen_creen_recording-13.png” iPhone
There are two ways to stop screen recording on an iPhone.第一個是再次打開控制中心,然後點擊(現為紅色)屏幕記錄圖標立即停止錄製。
點擊iPhone屏幕錄製中心屏幕。
點擊紅色欄以在iPhone
下停止
Confirm stopping screen record on iPhone
Regardless of the method used, you get a message at the top of the screen letting you know what happened to your video.就我而言,將其保存到照片中。
You can find your screen recording in the Photos app
Tapping the message highlighted in the previous screenshot takes you to the Photos app and plays your recording.您還可以隨時打開照片應用程序以查找保存在其庫中的視頻。
為什麼您需要使用iPhone屏幕錄製?
現在您知道如何將屏幕錄製添加到iPhone,設置並使用它來製作您想要共享的內容的視頻。我上次用它向老闆展示了iOS照片應用程序的複雜方式,因為沒有視覺輔助,他無法理解其用戶界面。您知道Android用戶的情況。 🙂但對我們來說足夠了。 Why did you need to use the iPhone Screen Recording feature? Was it for work or fun? Did you enjoy using it? Let me know your answer in the comments section below.